Install Eclipse for Java development
Eclipse Installation for Java Instalar Eclipse IDE para Java
Actual programs can have hundreds or thousands of classes. Working with the console can be a nightmare. The reality is that most programmers use an "Integrated Development Environment" (IDE).
Eclipse is the most widely used IDE for Java development. It's open source and free. Eclipse, can extend its functionality by the development of plugins. There are many Eclipse versions to program in different languages and even many Java versions.
Other "Integrated Development Environments"
There are other development environments for Java, like Netbeans and IntelliJ IDEA.
- Netbeans is Oracle IDE, which is the main supplier of JDK. It is free and used in academic circles, but not professionally.
- IntelliJ IDEA, however, is recommended by many professionals, but it is not free and is not used as much.
Eclipse tools and components for Java
There are many versions of Eclipse for Java and they also can be extended by plugins. It is very difficult to list all its components because they are more every day, but below we have a short list of the most used:
-
Intelligent Editor: allows us to know which are the available classes, methods and fields members of an object or class.
-
Correction and auto compilation: Eclipse, compiles the code automatically and shows the errors.
-
Support for debugging: We can stop the program on the line of code that interests us. We can follow the code step by step, debug different threads ...
-
Web: it has a jsp editor. It lets you start, stop and deploy in different web servers.
-
Manager versions: installing plugins it supports Subversion, Github and more.
-
Android, GWT and GAE Google App Engine: Google has developed plugins for most of its Java technologies.
Download and Install Eclipse
Write in Google; "Download eclipse" and https://www.eclipse.org/downloads/ or something similar will appear. There you can choose from many Java versions. I recommend the lightest: "Eclipse IDE for Java Developers, 153 MB". This is how it appears the day I wrote this tutorial.
Download and unzip the zip file in for example "c: \".
Workspace
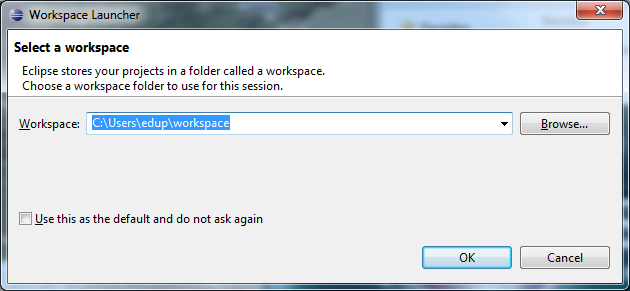
Run c:\eclipse\eclipse.exe and select the workspace. This is where Eclipse will save all projects.
I recommend you create the workspace inside the Eclipse installation; “c:\eclipse\workspace”.
In the tutorials we are going to work with different versions of Eclipse so it is better to have different workspaces.

Create a project and run a class
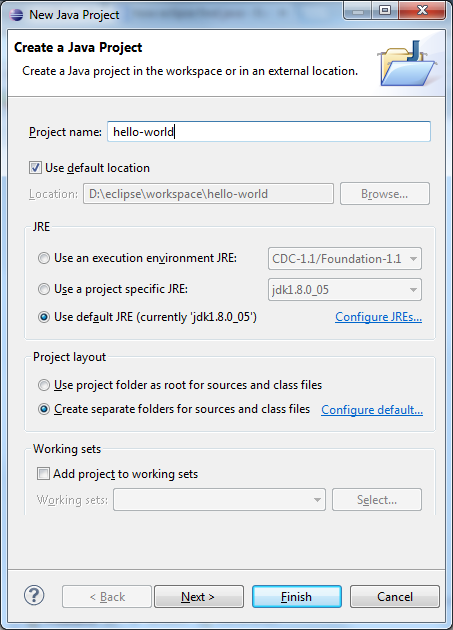
File - New - Java Project

IMPORTANT: Pay attention to choose the right JDK installed as JRE in the previous window. If it is not displayed, go to "Configure JREs" and add it.
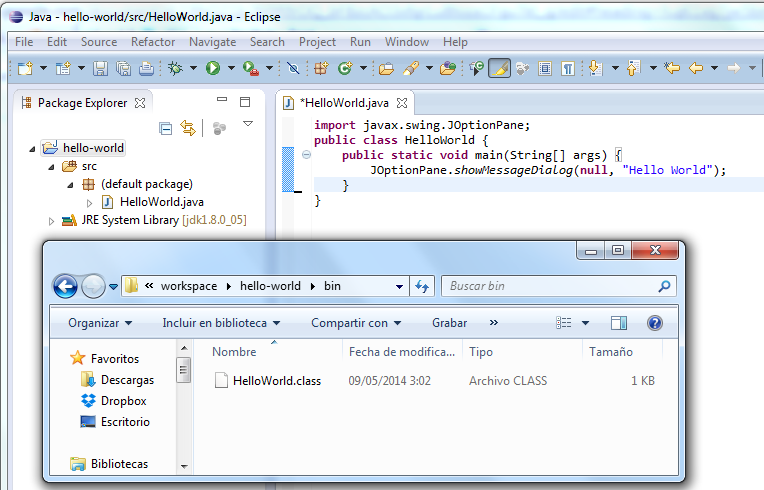
Open the "Hello-world" project and copy the code from the previous example in the src directory. If you copy and paste the text of the class, selecting "src", the file is automatically created. To run the class, right-click on the class and then Run As - Java Application.
Summary
Eclipse uses the JDK selected to obtain the libraries, compile and run on the JVM. Looking at the directory “C:\eclipse\workspace\hello-world”, we will see that there is a bin directory.
This directory holds the files ".class". There is one for each class, in the src directory.


