Creating an executable jar file and what is a virtual java machine.
In this tutorial we will see how to create an executable file for a java application, in particular for our game. A java program needs a virtual machine to be executed. Below we will explain what is a virtual java machine and how it works.
Java Virtual Machine (JVM)
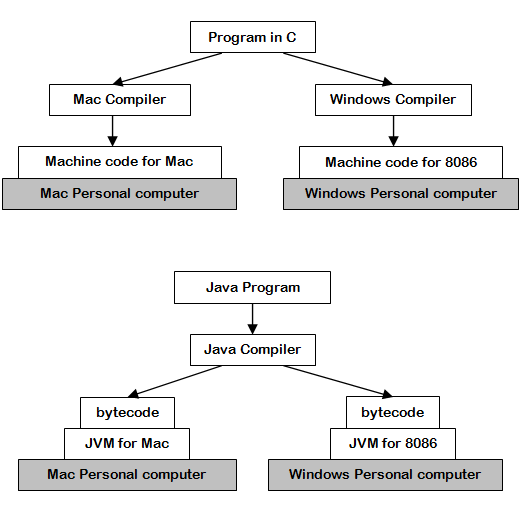
Before Java, we wrote a program in a high level programming language like C or Pascal and then we had to translate it to machine language with a compiler. The "machine language" or "machine code" is the language which the machine understands. A machine with Windows and a Mac of Apple talk different machine language. That is why we need a different compiler for each machine.
In the case of java, when we use the compiler, we don´t obtain machine code. We obtain a code called bytecode which doesn´t execute directly on a real machine. This bytecode can only execute on a virtual machine. A virtual machine is a program which works as if it was a machine. For each different operative system there will be a specific virtual machine program but the bytecode executed will be the same.

As the bytecode is potentially the same, it can be executed in any operative system when there is an implementation of the JVM for that operative system. The following famous sentence is based in this idea: "Write once, run anywhere" (WORA).
Compilation and execution in java
There are two installation versions for java for each operative system JRE and JDK. JRE Java Runtime Environment, is a reduced version which contains the JVM, but doesn´t include the java compilator. JDK Java Development Kit contains the JVM, the java compilator and other aditional tools for the development of java aplications. If you don´t have the JDK version installed, you should install it to be able to continue with this tutorial.
If we have the JDK installed, we have a directory with all the files which make up the java platform. This directory is known as java Home or JAVA_HOME. In my case it is "C:\Program Files (x86)\Java\jdk1.6.0_27".
Inside JAVA_HOME there is a folder bin which contains the executable with the compilator: javac.exe and the virtual machine: java.exe.
To show how these programs work, we are going to create a file called HelloWorld.java in a directory C:\testjava with the following content:
import javax.swing.JOptionPane;

public class HelloWorld {
	public static void main(String[] args) {
		System.out.println("Hello World ;)");
		JOptionPane.showMessageDialog(null, "Hello World");
	}
}
We open a command window, we execute "cd C:\testjava" to locate us in the directory where our java file is and to compilate we execute:
javac HelloWorld.java
or
"C:\Program Files (x86)\Java\jdk1.6.0_27\bin\javac" HelloWorld.java
As a result we can see that a new file HellowWorld.class has been created with the bytecode. We can execute this bytecode with the following instruction:
java HelloWorld
or
"C:\Program Files (x86)\Java\jdk1.6.0_27\bin\java" HelloWorld
A java program is made up of several java files and consequently several *.class files. We also have the resources files, as for example, the sounds of our aplication. Java allows us to pack an aplication with all the files we´ve talked about before, in a *.jar file.
JAR file
A jar file is a compressed file with the zip algorithm of compression, which can contain:
- The *.class files which are generated from the compilation of the *.java files, which make up our application.
- The resources files needed by our application (For example the sound file *.wav)
- Optionally, we can include the source code files *.java
- Optionally, we can have a configuration file "META-INF/MANIFEST.MF".
Creating an executable JAR file
For the jar file to be executable, we have to include in the MANIFEST.MF file, a line indicating the class which contains the static method main() which will be used to start the aplication. In our last example it would be like this:
Main-Class: HelloWorld
It is important to highlight, that at the end of the line, we have to add a carriage return so that it works. I invite you to create a testjava.zip file containing a HelloWorld.class file, the META-INF directory and inside it a MANIFEST.MF file with the Main-Class line: HelloWorld. For this you can use the Winzip or WinRAR programs, which you can download free (look for it in Google).

Once you have created the testjava.zip file, we change its name for testjava.jar and we execute it from the command line:

We can also execute it with a double click on the JAR file.
How to create an executable JAR file from eclipse.
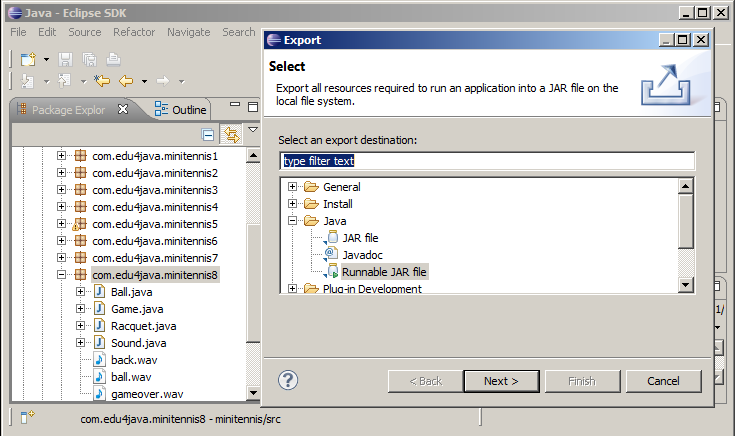
To create an executable JAR we go to File-Export and select Runnable JAR file

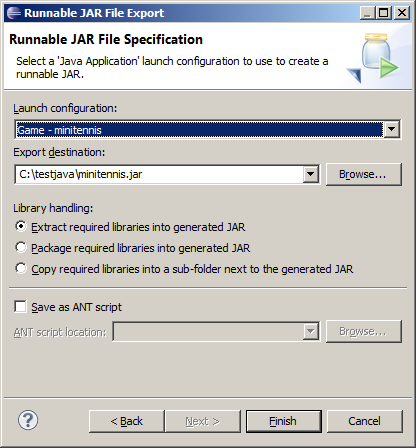
As we can see below, in "Launch configuration" we select the one we use to execute the final version of our application and in "Export destination" we indicate where we want to save our JAR and with what name:

If java is correctly installed over Windows, a doble click on minitennis.jar would be enough to execute our application.
Looking at minitennis.jar
If we decompress our minitennis.jar file, we will find the *.class files which make up our game. This files are inside the directory tree with the names of the java packages which contain the classes.
Inside META-INF/MANIFEST.MF, we can see in the last line, how the game must start with the main() method of the Game class, which is in the com.edu4java.minitennis8 package.

Eclipse does a great job, compiling, executing and creating JAR files, but is good to understand that eclipse uses the java installation in a similar way as in our HelloWorld example.
This is all for this tutorial... see you in the next one ;)
| << Adding punctuation and speed increase | Next>> |


